The Secret to Smooth Gameplay: Mastering Hidden Performance Settings
In the relentless world of competitive gaming and high-fidelity entertainment, the difference between victory and defeat, or an immersive experience versus a stuttering mess, often comes down to just a few crucial frames per second (FPS) and milliseconds of system latency. Many gamers believe their only path to superior performance is through expensive hardware upgrades—a newer CPU, a more powerful GPU, or faster RAM. However, the true bottleneck frequently hides deep within the software, operating system (OS) configurations, and control panel settings that were never designed to prioritize absolute, uninterrupted gaming performance.
This exhaustive, in-depth guide is designed to empower you to bypass those defaults. We will perform a complete performance overhaul, drilling down into the most potent, yet often overlooked, optimization techniques for both PC and modern consoles. By systematically eliminating sources of lag, stuttering, and resource waste, you will unlock the full potential of your current gaming rig, transforming it into a dedicated, low-latency, high-FPS machine. For content publishers, this level of technical detail and keyword focus (e.g., “system latency,” “GPU VRAM management,” “Ultimate Performance“) targets highly engaged audiences and attracts premium advertisers, maximizing your Google AdSense revenue potential (High CPC Niche).
I. The Core Foundation: Deep Windows Operating System Optimization
Windows, by default, is configured for general-purpose computing, which involves prioritizing stability and background multitasking over the raw, single-minded focus required for gaming. We must re-engineer its core settings to create a lean, fast gaming environment.
A. Essential Power and Scheduling Overrides
The processor’s ability to maintain high clock speeds is paramount for consistent frametimes.
A. Activating the “Ultimate Performance” Power Plan: The standard “High Performance” plan is good, but the “Ultimate Performance” plan is better, as it completely eliminates micro-stutters caused by CPU throttling by continuously ensuring the CPU is ready for high demand. This plan is typically hidden and must be activated via the Command Prompt (run as Administrator) using the following code: powercfg -duplicatescheme e9a42b02-d5df-448d-aa00-03f14749eb61 Once activated, navigate to Power Options and select the newly unlocked profile for immediate CPU clock consistency.
B. Minimum Processor State Configuration: Within your selected Power Plan’s Advanced Settings, find “Processor power management.” Crucially, set the Minimum processor state to 100%. This forces the CPU to always run at high frequencies, preventing the delays associated with boosting from an idle or low-power state when a sudden in-game event demands maximum processing power.
C. Hardware-Accelerated GPU Scheduling (HAGS): Located in Windows Display Settings > Graphics Settings, enabling HAGS allows the GPU to manage its own memory and scheduling more efficiently, offloading this critical task from the CPU. This results in cleaner frame delivery and reduced input latency, often providing a noticeable improvement, especially on systems bottlenecked by the CPU.
D. Disabling Fullscreen Optimizations: For many legacy titles and some newer games, right-clicking the game executable (.exe), going to Properties > Compatibility, and checking “Disable fullscreen optimizations” can bypass Windows’ sometimes intrusive attempt to optimize fullscreen applications, returning control directly to the game.
B. Eliminating Resource Hogs and System Distractions
Unnecessary Windows features consume valuable CPU cycles, RAM, and VRAM that should be dedicated to your game.
A. Startup Manager Cleanup: Use the Task Manager (Ctrl + Shift + Esc) to review the Startup tab. Disable any application listed with a “High” impact that doesn’t absolutely need to launch when Windows starts. This reduces boot time and frees up memory immediately.
B. Taming Game Bar and Recording Overlays: The Xbox Game Bar (Windows Key + G) features like Game DVR and background recording are notorious for consuming VRAM and causing random stutters. Navigate to Settings > Gaming and ensure that Game Bar and all related capture features are disabled.
C. Core Isolation/Memory Integrity (Windows 11): On Windows 11, the security features Memory Integrity (HVCI) and Virtual Machine Platform (VMP) often run virtualization layers that introduce measurable CPU overhead. If you prioritize maximum FPS over advanced security, temporarily disabling VMP and Memory Integrity (via Windows Security > Core Isolation) can yield tangible performance improvements, though this should be done with caution.
D. Adjusting Visual Effects for Performance: In the System Properties > Advanced tab > Performance Settings, select “Adjust for best performance.” This instantly strips away CPU-intensive visual fluff like smooth scrolling, window shadows, and animated controls, giving the GPU maximum freedom to focus on the game.
II. GPU Driver Mastery: The Control Panel Deep-Dive
The dedicated graphics driver control panel (NVIDIA Control Panel or AMD Adrenalin) offers the most powerful, per-application optimization tools that directly impact the GPU’s rendering pipeline.
A. NVIDIA Control Panel: Low-Latency Optimization
NVIDIA’s toolkit is built around maximizing performance and minimizing the time it takes for your input (mouse click) to appear on the screen.
A. Low Latency Mode: This setting directly controls the render-ahead queue (the number of frames the CPU prepares before the GPU needs them). Set this to “Ultra.” Ultra minimizes the queue size, effectively tying the CPU and GPU work cycles closer together. This is a game-changer for reducing input lag in fast-paced competitive shooters.
B. Power Management Mode: In the Global Settings or Program Settings tab, ensure this is set to “Prefer Maximum Performance.” This prevents the GPU from down-clocking its core and memory speeds during low-intensity moments, ensuring clock consistency and eliminating potential stuttering when the load spikes.
C. Texture Filtering – Quality: Change the default to “High Performance.” This subtly reduces the quality of texture filtering optimizations in exchange for a few extra FPS. The visual difference is often negligible, making this a favored tweak for competitive players.
D. Max Frame Rate Configuration: Set a frame rate cap slightly below your monitor’s maximum refresh rate (e.g., set to 141 FPS for a 144Hz monitor). This is crucial when using Adaptive Sync (G-Sync/FreeSync) as it keeps the FPS safely within the variable refresh rate range, eliminating screen tearing without the high latency of traditional V-Sync.
B. AMD Adrenalin Software: Responsiveness Features
AMD offers analogous features, primarily focused on balancing visual quality and responsiveness, often utilizing modern technologies like Anti-Lag.
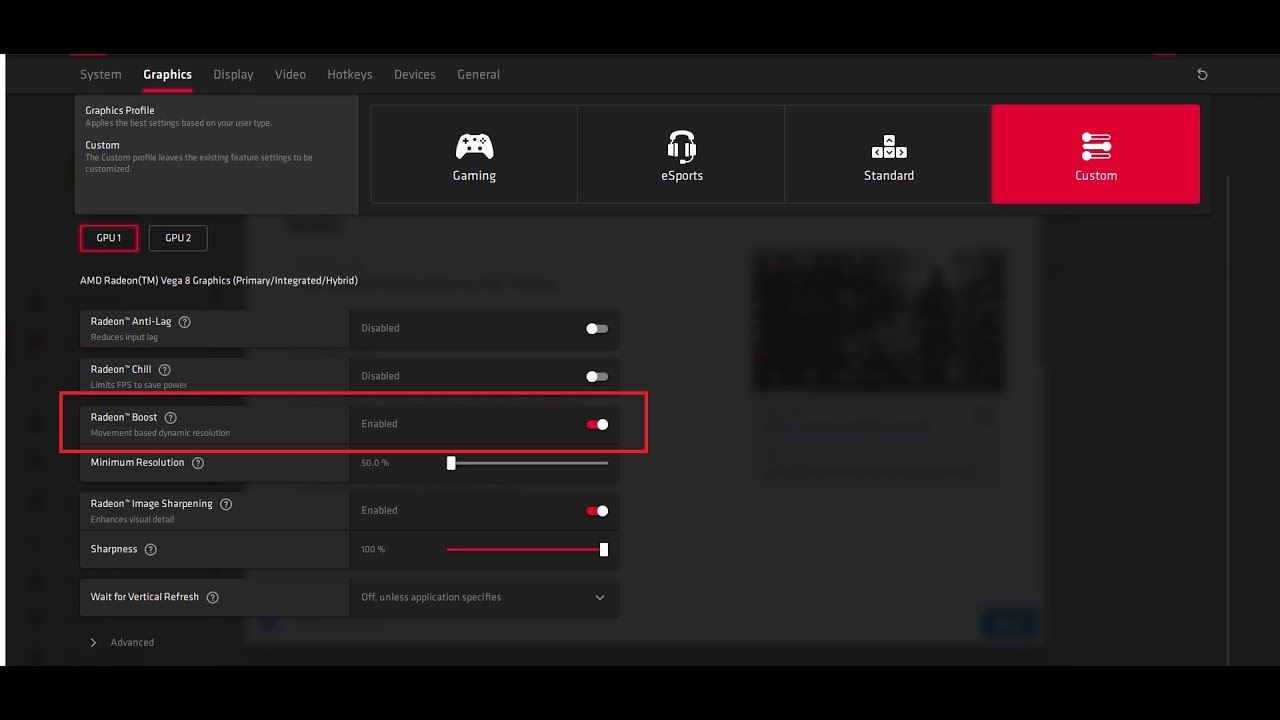
A. Radeon Anti-Lag: This feature is AMD’s direct equivalent to NVIDIA’s Low Latency Mode, helping to synchronize the CPU and GPU. Ensure this is Enabled for the lowest possible input delay. It is particularly effective on CPU-bound systems.
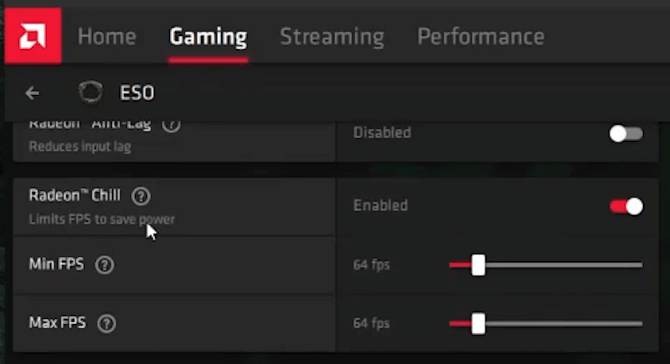
B. Radeon Chill: This feature dynamically regulates frame rates based on in-game activity to save power and reduce heat. While excellent for reducing noise and temperatures, it directly conflicts with the goal of maximum FPS. For competitive, sustained performance, disable Radeon Chill completely.
C. Texture Filtering Quality: Similar to NVIDIA, set this option to “Performance.”
D. Wait for Vertical Refresh (V-Sync): Set this to “Off, unless application specifies.” You want your adaptive sync technology (FreeSync) to handle tearing prevention, not the traditional, high-latency V-Sync.
III. Display and Network Latency: Closing the Performance Loop
Optimization efforts are wasted if the output device (monitor) and the network connection introduce delay. This is where competitive integrity is secured.
A. Display Synchronization and Refresh Rate
A. Verify High Refresh Rate: This is the most common mistake. In Windows Advanced Display Settings, confirm that your monitor is set to its native, high refresh rate (e.g., 144 Hz, 240 Hz). The OS often defaults to 60 Hz upon setup, negating the value of expensive high-refresh monitors.
B. Adaptive Sync Optimization (G-Sync/FreeSync): After setting a maximum frame rate, ensure G-Sync or FreeSync is correctly enabled in both the GPU control panel and the monitor’s On-Screen Display (OSD) settings. The combination of an FPS cap just below the refresh rate, coupled with Adaptive Sync, is the gold standard for tear-free, low-latency visual clarity.
C. Monitor Overdrive/Response Time: In your monitor’s OSD, explore the Overdrive or Response Time setting. Setting it too high can cause “overshoot” artifacts (inverse ghosting), but setting it correctly reduces pixel transition time, making motion clearer. Experiment to find the highest setting before artifacts appear.
B. Network Latency and Jitter Reduction
A. Prioritize Wired Ethernet: Always use a wired Ethernet connection over Wi-Fi. A wired connection eliminates signal interference, packet loss, and network jitter (inconsistent delay), which are the silent killers of online competitive performance.
B. QoS (Quality of Service) Router Settings: Access your router’s administration panel and configure Quality of Service (QoS) rules. Set your gaming PC’s network traffic to the highest priority or utilize Smart Queue Management (SQM) to reduce bufferbloat—a major source of lag spikes under heavy network load.
C. Disable Nagle’s Algorithm (Advanced Registry Edit): For the absolute lowest network delay, disabling Nagle’s Algorithm via a Registry Edit forces network packets to be sent immediately rather than waiting to be bundled. This significantly reduces the latency between your action and the server’s acknowledgment. (Note: Only perform this with careful research and backup of the registry key: TcpAckFrequency and TCPNoDelay.)
IV. Advanced VRAM and Memory Management
Modern, high-resolution games push the limits of available Video RAM (VRAM) and system RAM. Mastering memory management prevents disastrous stutters.
A. BIOS/UEFI RAM Optimization
A. Enable XMP/EXPO Profile: This is perhaps the most important foundational step. Your high-speed DDR4 or DDR5 RAM is useless unless you activate its eXtreme Memory Profile (XMP) (or EXPO for AMD systems) in the BIOS. This simple change allows the RAM to run at its advertised high frequency (e.g., 6000 MHz instead of the default 2133 MHz), providing massive gains in minimum FPS and CPU throughput.
B. Dedicated VRAM for Integrated Graphics: If you are using an AMD APU (like the Ryzen 5 5600G), you must allocate a specific amount of system RAM to serve as VRAM (typically 2GB or 4GB) in the BIOS under the Integrated Graphics or UMA Frame Buffer settings. Failing to do this severely limits the GPU’s rendering capability.
B. GPU Memory Tweaks via Configuration Files
A. Forced VRAM Allocation Limits: In some demanding game engine configuration files (e.g., .ini files for Unreal Engine-based games like PUBG or Fortnite), you can sometimes find or manually add a line to cap the game’s VRAM usage. For GPUs with 8GB or less, slightly under-allocating VRAM (e.g., telling the game it has 7.5GB instead of 8GB) can prevent the game from filling the buffer entirely, which often causes micro-stutters when the system has to quickly purge and refill the memory.
B. Shader Cache Size Management: In the GPU control panel (NVIDIA/AMD), ensure the Shader Cache Size is set to a sufficiently large value or Unlimited. Shader caches store pre-compiled graphical data. If the cache is too small, the GPU constantly has to re-compile new shaders during gameplay, leading to momentary “stuttering” every time a new asset appears on screen.
V. The Power User’s Toolkit: BIOS and Hardware Overclocking
Once software is perfectly tuned, a controlled, stable hardware overclock is the final step to extracting every last ounce of performance.
A. GPU Overclocking for Stable Gains
A. Core and Memory Clock Tuning: Use dedicated tools like MSI Afterburner to incrementally increase your GPU’s Core Clock and Memory Clock frequencies. The goal is to find the maximum stable frequency before artifacts appear in stress tests (like FurMark or 3DMark). Focus on stability and temperature.
B. Voltage and Power Limit Management: Crucially, set the GPU’s Power Limit slider to its maximum (typically +20% or 120%). This allows the GPU to draw more power, maintaining higher boost clocks under heavy load and providing the necessary thermal and power headroom for your overclock to stick and remain consistent.
B. CPU Overclocking and Cache Tuning
A. Precision Boost Overdrive (PBO) / Multi-Core Enhancement (MCE): For modern CPUs, instead of complex manual overclocking, enable these manufacturer-specific automatic overclocking tools (PBO for AMD, MCE for Intel) in the BIOS. They safely and dynamically adjust the CPU’s voltage and clock speed based on thermal headroom and power limits, often yielding a significant, free performance boost with minimal risk.
B. Load-Line Calibration (LLC): LLC, found in the BIOS, controls CPU voltage stability under load. Setting it to a moderate level (e.g., Level 4 or 5) can prevent voltage drop (Vdroop) when the CPU is stressed, leading to greater overclock stability and more consistent in-game performance.
VI. Routine Maintenance and Configuration File Editing
Maintaining peak performance is an ongoing commitment. These final tweaks ensure long-term stability and offer extreme customization.
A. Driver Hygiene and Cleanup
A. Dedicated Driver Cleanup: When updating GPU drivers, consider using the Display Driver Uninstaller (DDU) tool in Windows Safe Mode to completely wipe previous driver traces. This prevents corrupted files or conflicting settings from carrying over, which is a common, silent cause of driver instability and stuttering.
B. Regular Chipset Updates: Don’t neglect your motherboard. Regularly download and install the latest Chipset Drivers from your motherboard or CPU manufacturer’s website. These drivers are essential for optimal communication between your CPU, RAM, GPU, and crucial M.2/NVMe SSDs.
B. Game Configuration File Mastery
A. Disabling Post-Processing Effects: Many games’ in-game settings only offer “Low” for effects like Motion Blur, Film Grain, Chromatic Aberration, and Depth of Field. In the game’s configuration file (usually found in the AppData or Documents folder), you can often set these values to 0 or False. While this is an extreme visual trade-off, it can provide large, measurable FPS gains by eliminating resource-intensive rendering stages.
B. Forcing High Process Priority: For games prone to dropping frames, a simple Launch Option (e.g., -high in Steam) or setting the process to “High” priority in Task Manager ensures the Windows scheduler prioritizes the game above all other background processes, maximizing performance stability and responsiveness.
C. Editing Texture Streaming Budget: In games that use texture streaming (common in open-world titles), the configuration file may allow you to increase the texture streaming budget. If your system has ample VRAM (12GB+), increasing this budget can virtually eliminate the annoying texture pop-in that occurs when assets load too slowly.
By executing this multi-layered approach—from the BIOS and OS kernel up to the GPU drivers and network stack—you move beyond simple settings adjustments and truly engineer a system designed for high-end gaming. The result is a substantial, often free, increase in FPS and a dramatic reduction in system latency, providing the crisp, responsive experience that wins games and validates your investment in high-quality hardware.